Automating PCF Installation using Concourse on AWS – 1

PIVOTAL CLOUD FOUNDRY (PCF) PAAS PLATFORM INSTALLATION USING CONCOURSE ON AWS CLOUD

Pivotal Cloud Foundry (PCF) PaaS Platform is a simple and great platform from a developer as well as Day 2 operation perspective.

Since long time Java Spring dominated the Java world, Millions of Java developers preferred and developed millions of lines of codes and applications using Pivotal’s Spring framework.

Now Pivotal’s Spring Cloud framework including Spring Boot and other Cloud native application frameworks has taken the cloud-native application development to another height of simplicity, with the Spring Cloud framework many server codes are embedded inside the code, just by writing few lines of code one can implement complex servers which otherwise required the help of a systems engineer or infrastructure engineer to get involved.

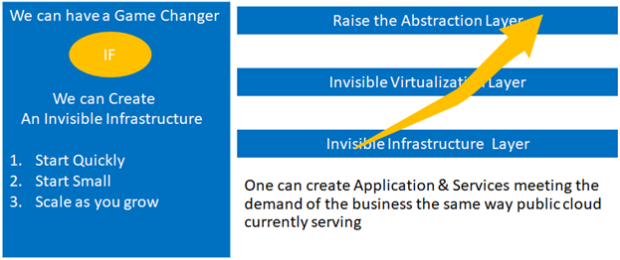
Pivotal Cloud Foundry is now the best platform for any cloud-native application which adhered to the 10-factor app principles. Because of the following advantages provided by the platform.

  1. Developers don’t need to need to know anything related to infrastructure on which their code is going to run.
  2. They don’t need to be bothered how the high availability of the application is going to be implemented.
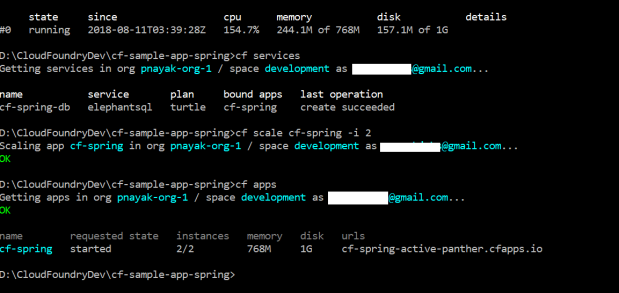
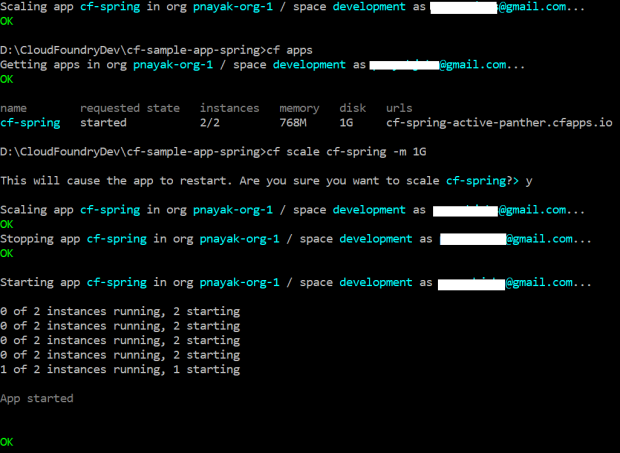
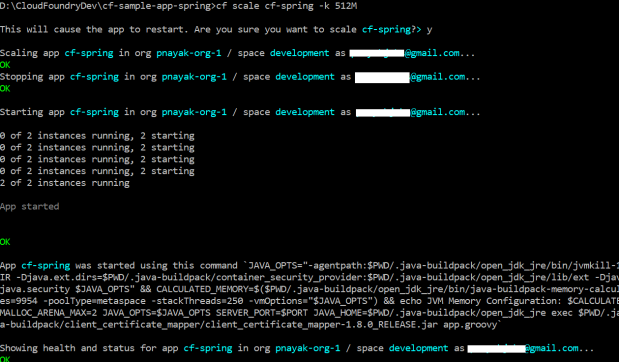
  3. They don’t need to bother how the scalability of the application is taken care of.
  4. Developers can test their code in an environment which is exactly the same as the production environment.
  5. As a developer don’t need to spend time nor wait for infrastructure implementation nor the day 2 operation, they can be focused on their code development.
  6. Other dependent Services can be created and attached to the applications when and where needed a very simplified manner.
  7. Blue-Green Deployment can be just like any other simple and straightforward process of switching the route of the application.
  8. Underlying platform and application security are inbuilt to the  So, your code is always secure. Security is applied with the 3’R principle, Repair, Repave, Rotate. I’ll discuss application security in another blog. Today I’ll focus on installation and Implementation of Cloud Foundry on AWS cloud.
  9. Dependency can be just provided as another service and can be bounded attached
  10. Complex Servers can be implemented using a few lines of Java code and the application can simply run on that server without any external help.

In a nutshell, Developer could say to PCF Platform, Hey, here is my code, just run it and I don’t care How.

And the platform has the intelligence to recognize the code i.e which language it is written, what dependency it has, what kind of OS its needs, so on and so forth.

And it ll provide the application all the required elements and run it in the desired way to give the output to the user. Not only it just runs the code, but it takes care of the High Availability, Scalability and Security requirement of the application without any further intervention from the developer or any other personnel during runtime.

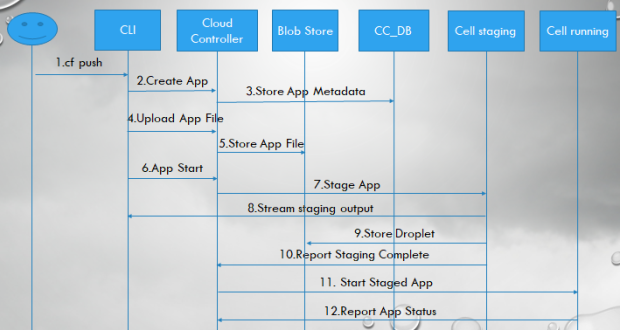
And that is done by a simple command i.e. “cf push”, these 2 magic words can take all the necessary actions required for an application to run in a Cloud Native environment.

Well for organizations to run Cloud Foundry, first they need to install and configure cloud foundry on a Cloud Environment (IaaS). The underlying IaaS can be any Private Cloud like vSphere or OpenStack, it can also be a Public Cloud Environment like Amazon AWS, Microsoft Azure or Google Cloud (GCP).

Well, it is It’s been difficult to install and configure a cloud foundry Instance on an IaaS environment and many different approaches had been applied to simplify the process.

But the latest PCF-Pipeline using Pivotal’s Concourse made it really simple and with this, we can even apply the CI/CD to the Pivotal CF Platform environment and maintain different versions of Cloud Foundry along with CI/CD for applications.

So, I am going to explain this process here. Here I am going to install Pivotal’s Cloud Foundry on AWS using Concourse CI tool.

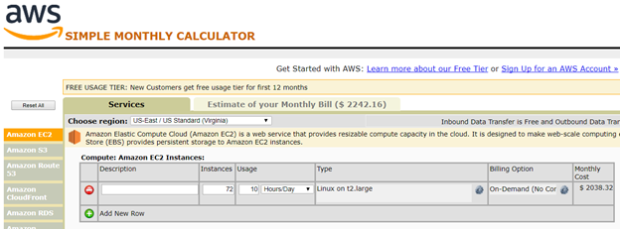
Step 1. Install AWS CLI

Step 2: Prepare your AWS account

2.1: Create an AWS policy with the following

{
    "Version": "2012-10-17",
    "Statement": [
        {
            "Sid": "VisualEditor0",
            "Effect": "Allow",
            "Action": [
                "logs:*",
                "elasticloadbalancing:*",
                "cloudformation:*",
                "iam:*",
                "kms:*",
                "route53:*",
                "ec2:*"
            ],
            "Resource": "*"
        }
    ]
}

3.2: Create some AWS users with the policy associated

$ aws iam create-user –user-name “bbl-user”

$ aws iam put-user-policy –user-name “bbl-user”  –policy-name “bbl-policy”   –policy-document “$(pbpaste)”

$ aws iam create-access-key –user-name “bbl-user”

Install bosh bootloader by the package manager

Mac OS X

$ brew tap cloudfoundry/tap

$ brew install bosh-cli

$ brew install bbl

Or you can download the installer from the following place for your OS type.

https://github.com/cloudfoundry/bosh-bootloader/releases

i.e for Linux

$ wget https://github.com/cloudfoundry/bosh-bootloader/releases/download/v6.10.46/bbl-v6.10.46_linux_x86-64

Step 3 : Install BOSH on AWS.

$ mkdir  my-concourse-bbl-state ; cd my-concourse-bbl-state

$ export STEMCELL_URL=”https://bosh.io/d/stemcells/bosh-aws-xen-hvm-ubuntu-xenial-go_agent

$ bbl up –lb-type concourse –aws-access-key-id xxxxxxxx –aws-secret-accesss xxxxxxxxxxxxxxxx –aws-region us-east-1 –iaas aws

here bbl takes a load balancer type argument as concourse, it means bbl knows the BOSH Director is created for creating a concourse environment and it ll use an AWS load balancer to load balance the traffic.

if you try bbl up –help you will find two type of value -lb-type accepts one is concourse and another is cf. Here we ll pass the value as concourse as I ll be installing cloud foundry with the help of concourse.

Go and have a hot coffee and come back this will take some time to finish. 

After you come back, you will see  3 instances on AWS are created, with one BOSH director  instance.
AWS Console view
The state of the bosh environment is saved to the folder my-concourse-bbl-state. bosh print-env command will give us the complete state of the bosh environment.
$ eval $(bbl print-env)

$ bbl director-ca-cert > bosh.crt

$ export BOSH_CA_CERT=bosh.crt

$ bosh alias-env bosh-1

$ bosh login
Record the name of the loadbalancer created from the following command.

$ bbl lbs

Concourse LB: bbl-env-ti-e8080cb-concourse-lb [bbl-env-ti-e8080cb-concourse-lb-78c2a74d80d38479.elb.us-east-1.amazonaws.com]

or you can get if directly from the AWS console too.

Now if you have your own website domain you can create a hostedzon on AWS route 53 and create a A Recor Set to access the load balancer URL. I ll explain that in another blog.

here is a screenshot of my record set

After this I can access my concourse as https://concourse.lab.pnayak.com

Step 4 : Deploy Pivotal’s open source CI tool Concourse

Now lets deploy Pivotal’s open source CI tool Concourse. Concourse is a pipeline-based CI system written in Go language.
First clone the bosh deployment of concourse ,i.e concourse-bosh-deployment git repository.
$ git clone https://github.com/concourse/concourse-bosh-deployment.git
$ cd concourse-bosh-deployment

edit the var file  ~/concourse-bosh-deployment/cluster/vars.yml according to the bosh environment just you created.for me it looks like the following

$ vi  vars.yml 

external_host: "bbl-env-al-fde418d-concourse-lb-b15c491e218bd82c.elb.us-east-1.amazonaws.com"

external_url: "https://bbl-env-al-fde418d-concourse-lb-b15c491e218bd82c.elb.us-east-1.amazonaws.com"

local_user:

 username: "pnayak"

password: "Passw0rd"

network_name: 'private'

web_network_name: 'private'

web_vm_type: 'c4.xlarge'

web_network_vm_extension: 'lb'

db_vm_type: 'c4.xlarge'

db_persistent_disk_type: '100GB'

worker_vm_type: c4.xlarge

deployment_name: 'concourse'

Note – If you have created a rRecord Set please replace the external_host and external_url to your own concourse external URL for me it is “concourse.lab.pnayak.com”.

Now before deploying the Concourse cluster we need to upload the stemcell for the instances.

So execute the following command to upload the stemcell to the bosh environment from https://bosh.io/d/stemcells/bosh-aws-xen-hvm-ubuntu-xenial-go_agent?v=170.9

$bosh upload-stemcell --sha1 87b2b4990544baed1d3b0561bc391ca98cb28062 \

  https://bosh.io/d/stemcells/bosh-aws-xen-hvm-ubuntu-xenial-go_agent?v=170.9
After the Stemcell is uploaded then we can start the deployment of concourse.To confirm availability of the stemcell run the following command in your terminal
$bosh stemlcells

To achieve that  execute the following bosh command

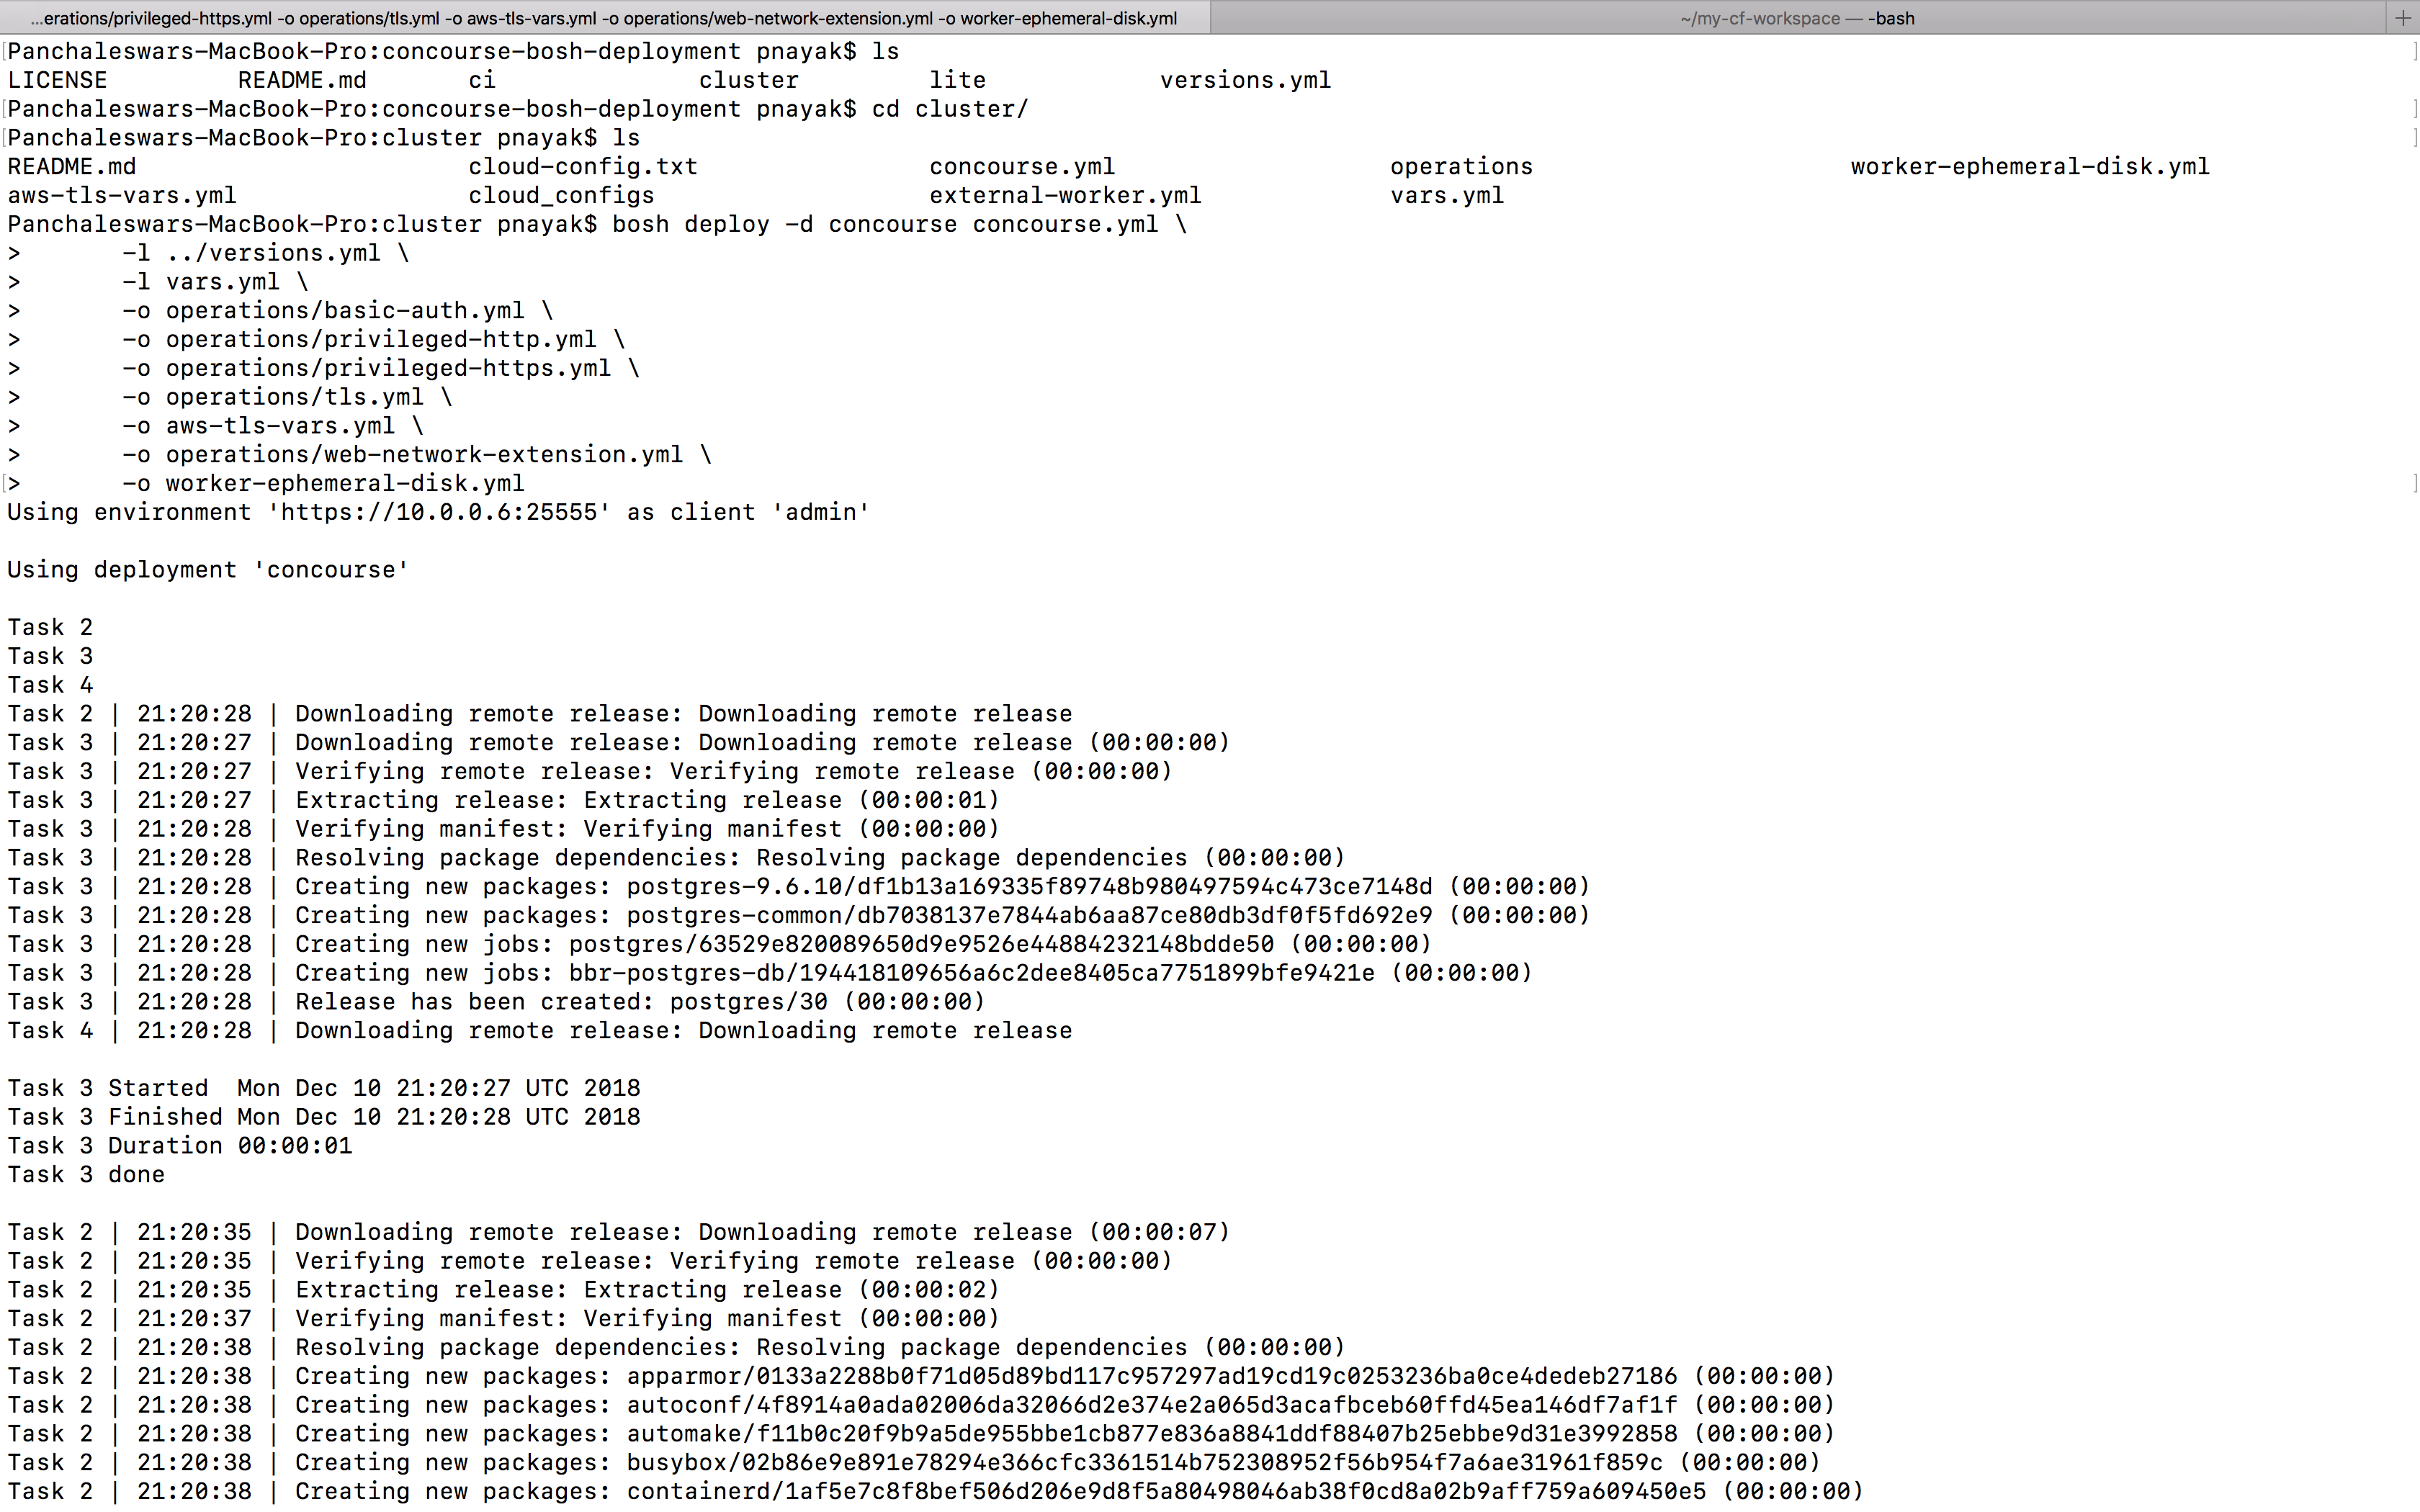
$ bosh deploy -d concourse concourse.yml \

       -l ../versions.yml \

       -l vars.yml \

       -o operations/basic-auth.yml \

       -o operations/privileged-http.yml \

       -o operations/privileged-https.yml \

       -o operations/tls.yml \

       -o aws-tls-vars.yml \

       -o operations/web-network-extension.yml \

       -o worker-ephemeral-disk.yml

Cloud Config View for the concourse instances.

Concourse Environment Creation Succeeded. It Created an web server instance along with the Concourse Worker Instance and the DB instance.

Here is the AWS Console view of the Concourse and other instances along with the BOSH Director.

Now you can login to the concourse web instance as follows.

put http://concourse.lab.pnayak.com on your browser and you ll get a page like this

Login using your login username and password you entered in your vars.yml file.

if you want to login from your terminal you can do so as follows.

Install concourse CLI in your laptop or Desktop

Download concourse CLI from the  URL https://concourse-ci.org/download.html

Download the CLI “fly” for your OS and put into your PATH directory.

you can test the concourse CLI named fly  by  typing $fly -v or $fly –help

Now to login to the target concourse environment type the following command and execute it.

$ fly -t concourse login -c https://concourse.lab.pnayak.com -k (-k should be used if you want to  ignore the SSL certificate)

Now copy the output of the command and paste it on the browser to login with your username and password, once successful you can go back to your terminal and see you have successfully logged-in to concourse using fly.

I ll cover the next section of the Cloud Foundry Installation and automation using Concourse in my Next blog please check here.

Automating Installation of  Pivotal Cloud Foundry on AWS-2

CI/CD for Microservices Using Jenkins and Kubernetes

Run a Kubernetes Cluster

For simplicity we ll run a singlenode cluster named minikube on windows platform using virtualbox

Install Virtualbox

Download Virtualbox from the following URL or the latest from virtualbox.org

https://download.virtualbox.org/virtualbox/5.2.12/VirtualBox-5.2.12-122591-Win.exe

Install on your windows machine. i.e laptop or desktop.

Download Minikube from here

https://storage.googleapis.com/minikube/releases/v0.27.0/minikube-windows-amd64.exe

Save it to the following directory

D:\blog-microservices\bin

Rename the executable as minikube.exe

Download the kubernates CLI “kubectl” from the following URL

https://storage.googleapis.com/kubernetes-release/release/v1.10.3/bin/windows/amd64/kubectl.exe

Save the file kubectl.exe to D:\blog-microservices\bin

Download “Helm” for windows,helm is the package manager for Kubernetes and managed by CNCF (https://www.cncf.io/projects/) and save it to D:\blog-microservices\bin directory.

https://storage.googleapis.com/kubernetes-helm/helm-v2.9.1-windows-amd64.zip

Add the directory D:\blog-microservices\bin to the system path as follows

Start Minikube

Open command prompt and enter the following command

D:\blog-microservices>minikube start (if you have 8 GB of total memory in your laptop or dektop)

D:\blog-microservices>minikube start –memeoy 8192 –cpus 2 (if you have 16GB of main memory in your laptop or desktop)

Test Minikube by executing the following commands

D:\blog-microservices>minikube status

or D:\blog-microservices>kubectl get cs (cluster status)

D:\blog-microservices>minikube dashboard (to see default kubernates dashboard)

Now you can execute the kubernetes CLI kubectl,go ahead and test the CLI

D:\blog-microservices>kubectl get nodes

Install Jenkins on Kubernetes

Create persistent volume for the Jenkins master

Install Sping IDE for java Springboot App

download the IDE from here https://spring.io/tools/sts

http://download.springsource.com/release/STS/3.9.4.RELEASE/dist/e4.7/spring-tool-suite-3.9.4.RELEASE-e4.7.3a-win32.zip

For installing Jenkins on your laptop or Desktop please visit my YouTube channel for CI/CD.

I ll post next part of this Blog tomorrow.


Working with Pivotal Cloud Foundry Web Services with a free Account

To Start working on Pivotal Cloud Foundry PAAS Platform first create a free account on pivotal.io and get a trial account.

After registration login with the following URL to the public PAAS environment and create an ORG for your account.

Pivotal WS account

https://login.run.pivotal.io/login

Next download the cf command line tool from the following URL

https://packages.cloudfoundry.org/stable?release=windows64-exe&source=github

Unzip the installer and double click on the installer named cf_installer.exe

After installing the cf CLI execute the command cf -v to see if the cf command works fine or not.

CF instalation

D:\CloudFoundryDev\cf-sample-app-spring>cf -v
cf version 6.38.0+7ddf0aadd.2018-08-07

To test an application you need to either programm your own application or you can download or clone an application from github

To clone an application from github you ll need git tool ,so install git on your desktop or laptop

Clone the code repository to your local folder

D:\CloudFoundryDev>git clone https://github.com/cloudfoundry-samples/cf-sample-app-spring.git

D:\CloudFoundryDev>cd cf-sample-app-spring

D:\CloudFoundryDev\cf-sample-app-spring>cf login -a https://api.run.pivotal.io

Provide the username and password for your pivotal trial account.

cf-login-public paas

After login execute the command

D:\CloudFoundryDev\cf-sample-app-spring>cf push

This will push the application to the cloud foundry PASS platform

I ll give a small explanation of what happens when you execute the command cf push

push sequence

1.User execute cf push on CLI

2.Cf CLI tells the cloud controller to create a record for the application.

3.Cloud controller stores application metadata

4.Before uploading all the application source files, the cf CLI issues a resource match request to the cloud controller to determine if any of the application files already exist in the resource cache.

5.The cloud controller stores the application package in the blobstore.

6.The cf cli issues an app start command.

7.The cloud controller issues a staging request to diego, which then schedules a diego cell(“cell”) to run the staging task (“task”)

8.The cell streams the output of the staging process so the developer can troubleshoot application staging problems.

9.The task packages the resulting compiled and staged application into a tarball called a “droplet” and the cell stores the droplet in the blobstore.

10.The diego bulletin board system reports to the cloud controller that staging is complete.

11.Diego schedules the application as a long running process on one or more diego cells.

12.The diego cells report the status of the application to the cloud controller.

running app

sample-spring-app

To View the sample app Logs run the following command

D:\CloudFoundryDev\cf logs cf-spring –recent

Or, stream live logs: D:\CloudFoundryDev\cf logs cf-spring

Now let’s connect a Database

PCF enables administrators to provide a variety of services on the platform that can easily be consumed by applications.

List the available ElephantSQL plans:

D:\CloudFoundryDev\cf marketplace -s elephantsql

Create a service instance with the free plan:

You can create a service instance from CF CLI or from the Web Services Console too.

add-service-1

add-service-2

D:\CloudFoundryDev\cf create-service elephantsql turtle cf-spring-db

app-restart

Bind the newly created service to the app:

cf bind-service cf-spring cf-spring-db

bind-db

Once a service is bound to an app, environment variables are stored that allow the app to connect to the service after a push, restage, or restart command.

Restart the app:

cf restart cf-spring

cf services

app-restart-1

Scale the Application on Pivotal PAAS.

Increasing the available disk space or memory can improve overall app performance. Similarly, running additional instances of an app can allow an app to handle increases in user load and concurrent requests.

These adjustments are called scaling.

You can do scaling either from  the Web Application Manager or using the CF CLI.

scale-1

Scaling your app horizontally adds or removes app instances. Adding more instances allows your application to handle increased traffic and demand.

scale-2

Scaling your app horizontally adds or removes app instances. Adding more instances allows your application to handle increased traffic and demand.

Increase the number of app instances from one to two:

cf scale cf-spring -i 2

cf-scale-1

Increase the memory limit for each app instance:

cf scale cf-spring -m 1G

cf-scale-2

Increase the disk limit for each app instance:

cf scale cf-spring -k 512M

cf-scale-3

Installing Open Source Cloud Foundry on your Laptop or Desktop using BOSH Lite

I tried this method to install Cloud Foundry on my my Desktop which is having 32 GB RAM and a 8 core AMD processor.

I have installed Ubuntu 16 Desktop as the OS

The first step is install BOSH CLI v2

download the BOSH CLI  with the following command i.e using wget.

wget https://s3.amazonaws.com/bosh-cli-artifacts/bosh-cli-2.0.48-linux-amd64

Change the permission

chmod +x bosh-cli-2.0.48-linux-amd64

Move the file to /usr/local/bin

mv bosh-cli-2.0.48-linux-amd64 /usr/local/bin/bosh

Install OS specific dependency
$ sudo apt-get update
$ sudo apt-get install -y build-essential zlibc zlib1g-dev ruby ruby-

Now lets Install Bosh-Lite Director

$git clone https://github.com/cloudfoundry/bosh-deployment dev openssl libxslt-dev libxml2-dev libssl-dev libreadline6 libreadline6-dev libyaml-dev libsqlite3-dev sqlite3 -y

Make sure Ruby is installed

$ruby -v

Make a directory named deployments$mkdir -p ~/deployments/vbox

$cd bosh-deployment

Create a BOSH environment

$bosh create-env ~/bosh-deployment/bosh.yml –state ~/deployments/vbox/state.json
-o ~/bosh-deployment/virtualbox/cpi.yml -o ~/bosh-deployment/virtualbox/outbound-network.yml -o ~/bosh-deployment/bosh-lite.yml \
-o ~/bosh-deployment/bosh-lite-runc.yml -o ~/bosh-deployment/jumpbox-user.yml \
–vars-store ~/deployments/vbox/creds.yml \
-v director_name=”Bosh Lite Director” -v internal_ip=192.168.50.6 -v internal_gw=192.168.50.1 \
-v internal_cidr=192.168.50.0/24 -v outbound_network_name=NatNetwork

$bosh -e 192.168.50.6 –ca-cert <(bosh int ~/deployments/vbox/creds.yml –path /director_ssl/ca) alias-env vbox

$export BOSH_CA_CERT=$(bosh int ~/deployments/vbox/creds.yml –path /director_ssl/ca)
$export BOSH_CLIENT=admin
$export BOSH_CLIENT_SECRET=$(bosh int ~/deployments/vbox/creds.yml –path /admin_password)
$export BOSH_ENVIRONMENT=vbox

Add a route to the virtualbox VM

sudo route add -net 10.244.0.0/16 gw 192.168.50.6

SSH to the Director as jumpbox User

$bosh int ~/deployments/vbox/creds.yml –path /jumpbox_ssh/private_key > ~/.ssh/bosh-virtualbox.key
$chmod 600 ~/.ssh/bosh-virtualbox.key
$ssh -i ~/.ssh/bosh-virtualbox.key jumpbox@192.168.50.6

$git clone https://github.com/cloudfoundry/cf-deployment
$cd cf-deployment

$export STEMCELL_VERSION=$(bosh int ~/workspace/cf-deployment/cf-deployment.yml –path /stemcells/alias=default/version)
$bosh upload-stemcell https://bosh.io/d/stemcells/bosh-warden-boshlite-ubuntu-trusty-go_agent?v=$STEMCELL_VERSION

$bosh update-cloud-config ~/cf-deployment/iaas-support/bosh-lite/cloud-config.yml

$bosh -e vbox -d cf deploy cf-deployment.yml -o operations/bosh-lite.yml –vars-store deployment-vars.yml -v system_domain=bosh-lite.com

or
if you want to use pre-compiled releases.

$bosh -e vbox -d cf deploy cf-deployment.yml -o operations/bosh-lite.yml -o operations/use-compiled-releases.yml –vars-store deployment-vars.yml -v system_domain=bosh-lite.com

Login to Cloud Foundry

download cloud foundry cli

curl -L “https://packages.cloudfoundry.org/stable?release=linux64-binary&source=github&#8221; | tar -zx

sudo mv cf /usr/local/bin

$cf login -a https://api.bosh-lite.com –skip-ssl-validation -u admin -p $(bosh interpolate ~/cf-deployment/deployment-vars.yml –path /cf_admin_password)

cf login -a https://api.bosh-lite.com –skip-ssl-validation -u admin -p admin

Create an Organisation and a space

cf create-org pnayak-org
cf target -o pnayak-org
cf create-space development
cf target -o pnayak-org -s development

Deploy your new first application

git clone https://github.com/vchrisb/cf-helloworld ~/workspace/cf-helloworld
cd ~/workspace/cf-helloworld
cf push

Docker support

cf enable-feature-flag diego_docker
cf push test-app -o cloudfoundry/test-app

Save the environment

vboxmanage controlvm $(bosh int ~/bosh-deployment/state.json –path /current_vm_cid) savestate
vboxmanage startvm $(bosh int ~/bosh-deployment/state.json –path /current_vm_cid) –type headless

Delete the environment

bosh delete-env ~/bosh-deployment/bosh.yml –state ~/bosh-deployment/state.json \
-o ~/bosh-deployment/virtualbox/cpi.yml -o ~/bosh-deployment/virtualbox/outbound-network.yml -o ~/bosh-deployment/bosh-lite.yml \
-o ~/bosh-deployment/bosh-lite-runc.yml -o ~/bosh-deployment/jumpbox-user.yml \
–vars-store ~/deployments/vbox/creds.yml \
-v director_name=”Bosh Lite Director” -v internal_ip=192.168.50.6 -v internal_gw=192.168.50.1 -v internal_cidr=192.168.50.0/24 \
-v outbound_network_name=NatNetwork

Mitigating Compute Design Problem Spectre, alternate Solution to Public Cloud

I discussed in my last blog about the computer processor design flaw “Spectre”.

Now due to this design flaw in the processor ,many big cloud customers are now have a serious doubt about the security of their applications and data in the public cloud. Which is very much valid and worrisome ,then how to mitigate this problem is the next question,as the problem is with the hardware itself updating the hardware or releasing a hardware patch is too difficult task to achieve in a small span of time.And it is too impractical to remove the old processor and put a new one with a proper design.

Then what is the possible solution ? In my opinion seeing the different side to cloud computing,

Let’s understand the problem again,the design problem with the processor can give access to sensitive data when the attacker runs his code in the same hardware processor, it is a problem in a shared hardware resource environment like public cloud.So this problem does not have any impact on a non-shared hardware resource environment.

So if we prevent the attacker to have access to the underlying hardware,so that he can not have direct access to the processor or memory to run his code then we are safe,and how that can be possible ? If we run our application in our own data center and the data inside our own company firewall.

That gives us the answer,rethinking on our private cloud strategy.

Let’s discuss what we can derive from our experience from a public cloud.

Inspiration Drawn From Public Cloud

  • Start Quickly
    • Can we start a Project quickly as the Business user need? Answer is, Yes we can.
  • Start Small
    • Can we Start Small so that you can right size to match the need, right size the infrastructure spend to match your business spend? Answer is, Yes we can.
  • Scale as you grow
    • As we business grow up and down, can you scale up and down with your infrastructure? Answer is, Yes we can.

AWS, Azure, Google?

Yes, but it is important to answer the following questions before you should move your workload to public cloud.

  • Are all of your business Application Designed to run in the cloud?
  • Do you have many Predictive workload?
  • How many Elastic workload you run in the Public Cloud?
  • Does the economic reality of Public Cloud align with your business objective?
  • Does public Cloud security meet your business requirements?

The Hyperconverged Infrastructure can bring the Advantage of the Public Cloud along with the lower per VM cost and the required security we need for our Enterprise Data.

Hyperconverged Infrastructure Advantage

inspiration-public-cloud

So let’s see how we can achieve the Public Cloud functionality with Hyperconverged Infrastructure for a Private Cloud.

  1. Start Quickly – You can order one node and start working, One question is do you really start working on a Public Cloud VM after just purchasing it with a Credit Card? Off course not, we need time to plan and then Cloud architect or admin has to the design ,create the infrastructure before using it, In the same time we can also order one Hyperconverged Infrastructure and start using it.
  2. Start Small – Yes we can start with one node.
  3. Scale as you grow – We can buy more nodes as we progress with our Project and Increase in demand. The existing Infrastructure will scale and rebalance itself without much administration headache.
  4. Shrink or release the Infra as and when you are done: ?

Well that’s a Question mark, I am sure we can’t return a VXRAIL or Nutanix after using it, But then we can carefully plan our requirement so that we don’t have to return the Compute power we are already using.

So we almost get all the advantages of Public Cloud with a cheaper price and higher security of Data as we are doing it all in a Private Cloud.

Let’s discuss about some of the latest innovations also happened with processor, memory, networking and storage technology using which cloud computing became matured.

Server Power, Size and Cost

As the public cloud gained maturity, the hardware cost and the size has gone significantly low and small too. To give an example a “Raspberry Pi Zero” with a specification of 1GHz single-core CPU, 512MB RAM cost only $5, where we can very well run Ubuntu Linux.

You see Per CPU core ratio has gone up, Memory cost has gone down, SSD cost has gone down.This has an impact in the server cost and power used, we can get a very powerful server with a lot of storage with very low price and size.

Here is a small explanation of the way one can create a private cloud environment with different underlying hardware and technology. The right-hand side of the picture it shows how the per VM cost in a cloud environment has gone down.

pervm-cost

Let’s See how much the cost has gone down of the Hardware (I am assuming this configuration is not for a mission critical application) because I believe still mission critical application has not completely found their ways to Public Cloud.

A Server from 2U Rack mount Supermicro with following Quick Configuration may cost around $14000

2 CPU 24 Core, 256 GB DDR 4 RAM, Around 5 TB of Usable Storage.

Let’s assume I get 3 Servers and VMware vSphere Essentials Kit – $660 with 3 years Support.

Total cost is $14000 *3 + $660 = $42660 + Admin Cost

This configuration has –

24 * 3 = 72 Compute Cores

256 * 3 = 768 GB RAM

5 TB * 3 = 15 TB of Usable Storage.

VMware vSphere with one vCenter Server Instance.

I assume this Server configuration I can run for next 4 years (Enterprise Hardware is pretty stable and robust now) and if I don’t need all those HA and Data backup and Disaster Recovery Plan etc, I know I am over simplifying for the sake of Cost Containment but do all Enterprises really need all those features like Development and Testing team. Some low priority Software Servers etc?

Let’s see how many test Servers I can assign to my Development and Test team.

Assuming I ll give a minimum of 8 GB RAM server, I can create 768/8 = 96 VMs in this Server configuration. As I have 72 Compute Cores I ll reduce it to 72 Instances, assigning 1 core to 1 Instance.

Assuming my Developers will work 10 hrs per day, in Office 8hrs and may be 2 hrs. More in their own private time which is true, Developers work more than 8 hrs J.

I know I have to add the Electricity Cost, cooling cost, the real estate cost and the Human Resource cost etc to this calculation, but considering the size of today’s hardware I am sure it’s not too much, because the configuration I am speaking will hardly take any space, Any company can just create a small partition and run the server and secure it, It ll not add up any real estate cost.

Let’s compare this cost to same number of Instances of Same size on AWS.

http://calculator.s3.amazonaws.com/index.html

aws-cost-calculator

It comes as $2038/month

So for 48 months, $2038 * 48 = $97820 + Admin Cost.

$42,660 + Admin Cost vs  $97820 + Admin Cost in 4 years.

Let’s consider another configuration of VMs for the Server configuration above.

24 * 3 = 72 Compute Cores

256 * 3 = 768 GB RAM

5 TB * 3 = 15 TB of Usable Storage.

We have 72 physical cores i.e 72 * 2 = 144 Logical Processor Threads.

So I can run 144 VMs with one thread each which is the vCPU we know in any Public Cloud.

So if I assign 4 GB RAM to each VM with then I ll need 144 * 4 = 576 GB or RAM which is still less than our available RAM.

So let’s calculate the cost of 144 VMs with 1 vCPU and 4 GB ram on AWS.

Almost same result.

Actually the vCPU given by AWS is not a whole thread provided to your VM,It is a Shared Environment,and our logical CPU can be divided into many vCPUs.So actually we can create more number of VMs in our Server Env,if I go with RAM availability we can create 768/4 = 192 number of VMs with 1vCPU and 4 GB RAM.As the users are not going to use the processor continuously so the Environment is perfectly valid and can work as desired.

Let’s see what the cost with AWS is.

$2718/month * 12 (months) * 4 years = $130, 464.

So now we can compare again the cost.

$42,660 + Admin Cost vs  $130, 464 + Admin Cost in 4 years.

Here also you ll need a Cloud administrator, so the administrator cost is not we can add here as same you would incurred for creating your private cloud too.

Hyper Converged Infrastructure

Let’s consider the cost of Hyper Converged Infrastructure for your Private Cloud.Though this is an old blog from VMware, and I am not comparing any Hyperconverged Infrastructure vendors here. My cost assumptions almost correct here in the blog each server cost $27229, naturally the server is double powerful than my configuration.

Refer to the following 451 RESEARCH report

451-research

And referring to the blog from virtualgeek , The minimum cost of a VxRAIL Appliance from VMware cost around 60K.

From 6 cores to all the way up to 40 cores per CPU, from 64GB of memory all the way up to 1536GB of memory, from 3.6TB of storage all the way up to 48TB of storage.

vxrail

Let’s have a Quick Comparisons of Different Series of VxRAILs

VxRail Node Comparisons
  G Series E Series V Series P Series S Series
Form Factor 2U4N 1U1N 2U1N 2U1N 2U1N
Cores 8 – 32 6 – 40 16 – 40 8 – 44 6 – 36
Memory 64 GB – 512 GB 64 GB – 1536 GB 128 GB – 1024 GB 128 GB – 1536 GB 64 GB – 1536 GB
Hybrid Storage Capacity 3.6 TB – 10 TB 1.2 TB – 16 TB 1.2 TB – 24 TB 1.2 TB – 24 TB 4 TB – 48 TB
All-Flash Storage Capacity 3.84 TB – 19.2 TB 1.92 TB – 30.7 TB 1.92 TB – 46 TB 1.92 TB – 46 TB N/A
Use Cases General-purpose for broad hyper-converged use cases Basic for remote office, stretch cluster or entry workloads Graphics-ready for uses such as high-end 2D/3D visualization High-performance optimized for heavy workloads such as databases Capacity-optimized with expanded storage for collaboration, data, and analytics

 So the Hyperconverged Infrastructure can bring the Advantage of the Public Cloud along with the lower per VM cost and the required security we need for our Enterprise Data.

2018 Trends shaping IT cloud strategies

Here are some of the trends I believe will be followed post Meltdown and Spectre.

  • Co-location services are on the rise (It makes it easier to have multi-cloud strategy)
  • Hyperconverge your private cloud (build private clouds that operate like public clouds)
  • Use of container will be still a Question Mark as the Processor Design Flaw (Spectre in particular allows One Container can Access Data from another Container in the Same Host.
  • Cloud cost containment
  • Lift and shift those cloud apps (Lift-and-shift migration tools will accelerate the rate of cloud migration)
  • Enterprise apps may find their way out of Public Cloud to a more secured Co-Lo or a Hyper Converged Infrastructure based Private Cloud.
  • Openstack , Open Source Cloud Software adaption will be interesting to watch.

Please leave your comments.


With the discovery of Meltfdown and Spectre the Trend and Future of Cloud Computing

With the discovery of Meltfdown and Spectre the Trend and Future of Cloud Computing

Last week when the new Bug and Design Flaw (Meltdown, Spectre) was found with Processors (Intel and other Processors) there is a question now on the future of public Cloud computing, In fact one of my friend told me Public Cloud is dead. I replied I don’t agree with it, I have been seeing the Cloud Computing Technology perhaps from its Inception.

I am going to talk about the Processor Design Flaw names Spectre.

“Spectre” is a Design Flaw in Modern Computer Processor Design.

Modern processors want to be faster to serve the growing demand of today’s substantial computing requirements. In that way, the processor designers took some of the fundamental theories into consideration.

“Instead of waiting for a task, like a conditional check, to complete and then proceed to the new function based on the outcome; the systems speculate what may be the next task based on the previous task execution experience, and then save the result in a cache memory.

If the outcome of the conditional check is favorable then the system proceeds with the speculated task otherwise it discards it and proceeds with another task. By doing this – it allows the processor to work much faster.

Let’s analyze this problem with reference to a real world scenario in our life.

“I go for lunch to a restaurant every day, I order the same menu for a week and then change that next week and follow the same for that week again before changing it.

So first day the restaurant owner prepared the dish after my order but after 3-4 days of learning that I take the same menu every day the restaurant owner prepared the dish even before I arrived at the restaurant so that he can just serve me better and other customers faster as well.

But then suddenly on the fifth day I just didn’t order the same menu, I ordered a different dish, then obviously the restaurant owner has to discard the already prepared dish and then prepare the new dish for me and serve.

Now Mr. X was following me for sometimes to know my eating pattern and habits and what exactly I prefer to eat. Now Mr. X just went to the waste bin and try to find what is that discarded and then he got the discarded food and noted it down to know my eating habit and what dish I ordered to eat, in this way Mr X got my secret without anyone noticing that he got my secrets.”

So what the owner of restaurant did was “Speculative execution” and the waste bin can be compared to the “cache memory” inside the processor but the owner of the restaurant (the processor) didn’t bother about the discarded food in the bin.

It’s a good thing to have “speculative execution” which assists in the acceleration of the performance of the system. However, the designers never thought about the security of the data which is saved in the cache memory before the conditional check result comes back. Consequently, if someone can get access to this cache memory before it is discarded then they can access the data – including such things as encryption keys, usernames/passwords, and other security credentials – sensitive data which they are not supposed to have access to. And because this memory cache is inside the processor all of the security designed into the chip is circumvented.

This is the underlying problem which has been named “Spectre”.

Understanding Speculative Execution

Let’s take the Example of a Code.

IF A=B THEN

C = C+1

ELSE

C = C- 1


spectre

The IF … THEN instruction results in a branch, until this instruction is executed there is no way we would know which instruction will be computed next (addition or subtraction). Modern Processor takes advantage of “Speculative Execution”, A method where the processor may start speculating which instruction might be the next instruction based on the previous experience and then it starts executing the instruction even before the conditional branch instruction executes and comes back with the result.

So here in this case in may start executing both the instruction i.e addition and subtraction t the same time to reduce the time of waiting. And when the result of the conditional check comes back, the result of the undesired instruction is simply discarded.

Now if an attacker can read these cache memory (BTB) before it is discarded then the attacker has access to the Data which he is not supposed/allowed to access,

Branch prediction improves the performance of the instruction execution and results in faster processing of instruction of branches by making use of a special small cache called the branch target buffer or BTB. Whenever the processor executes a branch, it stores information about it in this cache memory. When the processor next encounters the same branch, it is able to make a speculation or “guess” about which branch is likely to execute.

Here is a Video which explained the Problem Spectre.

Here is video demonstrating the meltdown attack

Now I am writing my thoughts why I don’t think Public Cloud is dead. But yes there will be a change in the trends how enterprises use cloud computing.


Learn to use Openstack for Free

Here I am giving a link to my video,in this video I have explained how to use openstack to create a VM and learn to use it for free.You can access the VM from your home network using SSH and  putty from your windows laptop or desktop.

Trystack.org is the Openstack cloud Infrastructure  where you can create your VM and use it and learn for free using your facebook profile username and password.

#YesWeCan – Letter to our PM Nerendra Modi

Dear @NarendraModi Ji,
Last night I was listening to your #MannKiBaat on youtube,it was quite interesting and appealing too. I found you have asked everybody to participate and share their thoughts on #MannKiBaat and #YesWeCan.

After listening to your conversation with ordinary citizens of India along with US President @BarackObama ,suddenly one thing struck to my mind which I am thinking for sometimes now.

Before sharing my thoughts let me tell you one of my own experience which changed my thought process and belief about our own Indian Medicine system and ancient India.

Right now I am based out of Phoenix,Arizona ,USA,but originally from a small town in the Indian state of Odisha.Sometimes in 1996 – 97 when I was studying in Chennai and I suffered from Jaundice,after struggling for a month I returned to my home town so that my parents can take care of me.

I went to a Govt hospital at Dhenkanal, Odisha and the doctor prescribed medicines for another 2 month, but to my surprise when I went to purchase those medicines from a medical store near by,the owner of the store suggested not to buy those medicines from him but to go to a person who can cure me in less than 24hrs without any cost.I smiled at him and said I am not a fool to believe in your story that some one can cure jaundice in less than 24hrs.

Are you mad ? Jaundice can be cured in less than 24hrs ?

He said his own brother was cured from advance stage of jaundice ,when they were planning to admit him to AIIMS, Delhi for blood dialysis,but before going to Delhi they just tried as last option and that man cured him in less than 24 hrs.He asked me not to buy medicines from him for jaundice but after getting cured,I should come to him and buy other medicines from him in future.

It was convincing and I thought to give it a try.

The person he suggested me to go was the then chief priest of Jaggnath temple at Tigiria,Odisha,not the famous puri temple.Tigiria is a small town near Dhenkanal.

Tgiria

https://www.google.com/maps/place/Lord+Jagannath+Temple/@20.470963,85.510776,11z/data=!4m2!3m1!1s0x3a18e4ae146a9a9b:0xea1a48eb421ea374

Day 1 : around 11 am

The same day I went to Tigiria’s Jaggnath temple and I saw there are good number of people fomed a line and I stood to meet the priest ,all are jaundice patients.I stood in the line to meet him.

When my turn came I saw the man is old ,perhaps in his 70s with a typical Indian Village attire, I don’t think he was educated enough,but was decent, humble with a great confidence on his face with the satisfaction of curing the disease,there was no chair or table,he was sitting on ground,there was younger assistant for him,he asked me my problem and then started preparing his medicine. I wanted to see what he is preparing as I din’t believe him totally.

So in front of me he prepared and took 2 – 3 Ridge Gourd seeds and one tea spoon of curd and rubbed the outer black layer of seed with one of his finger on a plane stone with the curd.Then throw away the white portion of the seeds,The white colored curd became black.

ridge-gourd-seeds

He asked me to lie down with face up,then he administrated that black colored curd ,half tea spoon to each of my nostril and asked me to inhale the solution so that it goes towards my fore head rather than my lungs.Thats it.

He didn’t accept any payment that we offered,he politely declined and said he does not do it for money.If I am interested then I can donate something for the goddess Durga he was worshiping in that small hurt.

I came back Dhenkanal town to my sister’s home and found that I am developing severe cold and yellow colored mocus formed inside my nose and started coming out.Next day I found I am feeling better but not cured from Jaundice.So I decided to go back to the priest again and ask why I am not cured and it didn’t work for me as he claimed.

Day 2 : Around 11 am

I went Tigiria again and met him at the temple ,when he saw me again and found that I came back to him ,he got a bit irritated,he said I should have waited 2 -3 days more before coming back.

But then he prepared the same solution ,but this time with more Ridge Gourd Seeds perhaps 4 to 5,and 2 tea spoon of curd.I understood he gave me a stronger dose this time.He gave me a bowl of curd and asked me to eat the curd after taking a full bath with cold water.Also he asked me not to eat raw rice,non-veg, sag (leafs) for one week.And I can eat anything else I wish to including masala curry,in india doctors advice not to eat masala and particularly turmeric,he reasoned if I don’t eat properly I ll be weak.

Around 1 pm :

While returning back I developed severe cold and my head was very heavy,I was feeling uneasy,after returning back to Dhenkanal I took a full bath and had my launch ,some rice and the curd given by the priest.I could not eat fully as yellow colored water started running out of my nose.I developed fever and had little vomiting also.

As my condition deteriorated my sister asked my brother in law to take me to my home town to be with my parents.

Around 8 pm :

Evening I came back to my home town,that time my condition was really bad with fever,severe cold ,heavy head,running nose with yellow colored water.I could take very little dinner.My parents started worrying about me by seeing my condition.

12 midnight :

Around 12 midnight my condition further deteriorated ,the water flow from my nose was nonstop,if I lowered my head it was like two water streams coming out my nose.I had a thick towel it was totally wet with yellow colored water.Literally so much of water was coming out of my nose that I could squeeze the towel and water was coming from that.There was a continuous flow of yellow water.

From midnight to around 4 am :

My condition deteriorated and I could not tolerate the pain,I was feeling like any moment my head is going to burst.So much of heaviness and pain.Then I thought may be the priest gave me something bad and I am going to die tonight.I even said this to my mother that I may die tonight,as I can’t tolerate the pain in my head.I may stop breathing any moment,my mother didn’t sleep whole night and watching me helplessly,as there was no emergency clinic or hospital open that time of night.Even I started scolding the old priest (I regret it).

Around 4 am :
Slowly pain and heaviness of head reduced,I felt better and better,yellow water flow slowly reduced.

Around 7 AM morning :

There was no water flow from nose,only little mocus,my eyes were completely normal,no symbol of any yellow color in my whole body.There was no pain.

Around 10 am : I was feeling completely out of jaundice like I was one and half months earlier.

Yes I was out of jaundice in less than 24 hrs.Was it a miracle ? No, I don’t think so,it was not a miracle but nothing less than a miracle too.

I told my experience to one doctor in Bangalore ,he thought I am making a story,he didn’t believe me and said bring this man and I can give him a Nobel prize if he can cure jaundice in less than 24hrs and I am sure ,many who read this letter including you sir,will not believe too,but yes I am the proof I have experienced it,my parents, my sister and brother in law are the witness ,we know how it happened.

I believe ,It was not any supernatural power of him nor any miracle,but the respected ,humble and honest priest knew a medicine which the present medical fraternity of the world do not know.

Still many people of Odisha in Sambalpur district are suffering from jaundice ,it became a mater of concern for Odisha govt and central govt too.

sambalpur

https://www.google.com/maps/place/Sambalpur,+Odisha,+India/@21.470398,83.9728832,8z/data=!4m2!3m1!1s0x3a21167f047cd9b5:0x7660a40be684d655

But I am afraid the respected priest is no more and perhaps the knowledge of the medicine is gone with him as well,I heard his son is giving the medicine now but it’s not so effective as it used to be when his father was giving.

So what is the intention of telling my experience here ?

I appeal to you Sir,do something for these unsung heroes of India.lets take some steps to do some research on the techniques of these unfamiliar and unconventional medicines which really do wonder and miracles.

I know some will call them “Andh Vishwas” ,yes I too know some Andh Vishwas present in our Indian society.But there are some genuine people are there who knows some invaluable things.And we need to have something for them.May be we can find something which the world has not seen yet.As I believe ancient India was much more advanced than rest of the world.

Here is my analysis,why it didn’t work for me on first day ?

Because first day the priest didn’t give me the right amount of dose.

And Why I suffered with unbearable pain on the 2nd day and I felt like dying ?

May be second day ,it was a overdose for me.

So we,the modern world ,if we can do some research on this drug and find the perfect solution and dose then I am sure we can get ride of and can find a new medicine for this dreaded disease.

I have heard of many unconventional way of treatment present in different part of India for different disease ,instead of just calling them “Andh Vishwas” let’s give some platform to demonstrate their talent in public with govt support and do some research on them to refine those methods and drugs so that we all can be part of such miracles and revive our ancient and advanced treatment methods instead of just depending on the research of the western world.I am not telling western world is not advance in terms of medicine,but we also can have our own ways too.

#YesWeCan

respectfully

Panchaleswar Nayak

Readers of this letter ,request you to share this as much as possible.If you know or experienced anything different and unconventional way of treating a different disease please share it and write your own experience.

Warning : Do not to try the method I explained here at home,it can be dangerous for you,I am no way responsible of the outcomes if you try out this method for curing jaundice.If you want to try, you can contact the priest (son of the priest who treated me) of the Lord Jagannath Temple, Tigiria, Odisha,India.

https://www.google.com/maps/place/Lord+Jagannath+Temple/@20.470963,85.510776,9z/data=!4m2!3m1!1s0x3a18e4ae146a9a9b:0xea1a48eb421ea374

Cloudera’s Quickstart VM vs Hortonworks Sandbox comparison -Dec 2014

Last year I created a Comparative study of the two big hadoop distributions ,cloudera and hortonworks, with their Learning products Quick Start VMs from Cloudera and Sandbox from Hortonworks.

Now Lets do the same thing again,after one year lets see what has been changed and what is the Difference and similarities between these two products or Hadoop Distros.

So lets me act same way like a new user who is trying to learn Hadoop and Big Data through Cloudera or Hortonworks, I ll start analyzing these two products from a new users perspective and angle.

The pic of CloudEra Quickstart VM and Start CloudEra Manager.

CloudEra Quickstart VM-1

Well first thing comes to my mind is creating a working Hadoop Cluster. So lets create a Hadoop Cluster by adding more hosts to this Quickstart VM using the Cloudera manager.

I created  another CentOS VM on my Desktop.

datanode1-vm


open the Browser and access cloudera manager

Add the newly created VM to the Cluster by adding it as a Host to Cloudera Manager.

Here is the output

addhost-output

and the details of the error

addhost-error-details

So may be we are getting advanced in terms of adding new features and nationalities but we are still lacking on the basic functionalists and the need of a new user to learn Hadoop.I tried to install the cloudera -manager-agent manually to the datanode-host with the command

“sudo yum install cloudera-manager-agent ” and it installed correctly ,the download speed of the cloudera manager agent packages are quite slow,it took some time to download and install which is around 416 MB,in a 50 MBps pipe  it should be pretty fast.I am sure there will not be many simultaneous  download of the agent  so the download is slow.(the speed was really bad,I had to wait almost 30 mins to download the packages.)

cloudera-,anager-agent-download and install

Now lets see if still I can add the host to the hadoop cluster.

addhost-output

No still it is not going through,well I ll not try it more. As any new uesr would spend more time in learning the cluster and Hadoop rather than wasting time in digging out whats going wrong in adding the Hosts using Cloudera manager.

Now lets go and try the same thing with Hortonworks.

The Similar fuctionality to cloudera-manager is the Ambari from Hortonworks with which one can manage the hadoop cluster.

Hortoworks Sandbox VM

So lets check the Amabri fuctionality on the Hortonworks sandbox,I have logged in to the sandbox and enabled Amabri.

now lets login to Amabri and try to add a host to the Sandbox.

Hortoworks Sandbox Amari enabled

I created a new VM  ie datanode2.localdomain tried to add it to the Sandbox as a new host to the cluster.Well before I could add a host it is asking me to give a SSH Private Key.

Amari add-newhost

My comment :

Why should I crerate a Private SSH key and provide here,I have a VM ready and I need to add it to cluster ,simple let it create the key,this is a simple environment for learning ,why I need to do the basic admin work of creating a Private SSH key  ?

well let me create a Private SSH Key  and see if I can succeed

Immediately it returned as failed to add.It seems it didn’t connect to the VM at all.

Amari add-newhost-output-1

Let me try without using SSH and manually installing the Agent on the host.But is there any way to know how to install the Hortonworks Agent instalation ? I have to search on Google coz there is no info of that on the page 😦 .

Amari add-newhost-2

Well I found on Hortonworks site  the following info

” Chapter 5. Appendix: Installing Ambari Agents Manually

In some situations you may decide you do not want to have the Ambari Install Wizard install and configure the Agent software on your cluster hosts automatically. In this case you can install the software manually.

Before you begin: on every host in your cluster download the HDP repository as described in Set Up the Bits. ”

My Comments :

This tells me I have to install HDP repository first ,com on do I have to install all manually why should I use your tool  ? I can do eveything manually by learning hadoop. why should I use your tool ?

Should I install HDP repository now  ? I don’t think I  am in a mood to do that now.So I ll not proceed further on this.

So we came to know both the Learning VMs  lack the basic functionalists of creating a hadoop cluster. May be there are good for one VM show.This is not good for the guys who wants to know the admin part of hadoop cluster ,sorry guys better you create your own cluster from beginning by following documents provided by Apache or many be individually from Cloudera and Hortonworks.

These VMs are no good for learning Hadoop administration. Better you create you own Hadoop Cluster manually. To Create a Cluster please follow my earlier blogs.

Tomorrow I ll try to find the Development aspect of these Products (VMs)

Lets see how matured they are and how helpful they are for a Hadoop Developer.

Cheers

High Availability in the OpenStack Cloud

Openstack is based on a modular architectural design where services can be co-resident on a single host or, more commonly, on multiple hosts.

Before Discussing HA lets know in brief about the Openstack Architecture.

Openstack conceptual architecture:

openstack_havana_conceptual_arch

Q : With High Availability(HA) what we try to do ?

Ans : We try to minimize two things.

1. System downtime

This occurs when a user-facing service is unavailable beyond a specified maximum amount of time.

2. Data loss —

When the machine goes down abruptly there can be a loss of data ,Accidental deletion or Destruction of data.

Most high availability systems guarantee protection against system downtime and data loss only in the event of a single failure. However, they are also expected to protect against cascading failures, where a single failure deteriorates into a series of consequential failures.

The main aspect of high availability is the elimination of single points of failure (SPOFs). A SPOF is an individual piece of equipment or software which will cause system downtime or data loss if it fails. In order to eliminate SPOFs, check that mechanisms exist for redundancy of.

  1. Network components, such as switches and routers

  2. Applications and automatic service migration

  3. Storage components

  4. Facility services such as power, air conditioning, and fire protection

OpenStack currently satisfy HA requirements for its own infrastructure services. Means it does not guaranty the HA of the Guest VMs but its own Services.

Now Lets try to understand what are the Openstack Services are that needs to be Highly available.

1. Identity Service, i.e Keystone-API.

2. Messaging Service, RabbitMQ

3. Database Service, i.e MySql Serivce.

4. Image Service.i.e Glance-API.

5. Network Service,Newtron-API.

6. Compute Services ,Nova-API.

  1. Nova-API

  2. Nova-Conductor

  3. Nova-Scheduler

There two type of services here stateless and stateful.

A stateless service is one that provides a response after your request, and then requires no further attention. And the services are follows.

Keystone-api :

Keystone is an OpenStack project that provides Identity, Token, Catalog and Policy services for use specifically by projects in the OpenStack family. It implements OpenStack’s Identity API.

keystone

Glance-api :

Project Glance in OpenStack is the  Image Service which offers retrieval, storage, and metadata assignment for your images that you want to run in your OpenStack cloud. 

glance

Neutron-api :

Neutron is an OpenStack project to provide “networking as a service” between interface devices (e.g., vNICs) managed by other Openstack services

Nova-api :

vmwareapi_blockdiagram

Nova-Conductor : Nova-conductor is a RPC server. It is stateless, and is horizontally scalable, meaning that you can start as many instances on many servers as you want. Note that most of what nova-conductor does is doing database operations on behalf of compute nodes. The majority of the APIs are database proxy calls. Some are proxy calls to other RPC servers such as nova-api and nova-network.

The client side of the RPC call is inside nova-compute. For example, if there is a need to update certain state of a VM instance in nova-compute, instead of connecting to the database directly, make a RPC call to nova-conductor, which connects to the database and makes the actual db update.

Nova-Scheduler: Compute resource scheduling, it is the DRS for Openstack environment, people know DRS (Distributed Resource Scheduler)  in a VMware environment can understand its functionality if they understand what VMware DRS is.

nova-compute

Openstack stateful Services.

A stateful service is one where subsequent requests to the service depend on the results of the first request. Stateful services are more difficult to manage because a single action typically involves more than one request, so simply providing additional instances and load balancing will not solve the problem.

  • OpenStack Database 
  • Message Queue

The important thing to achieve HA is to make sure these services are redundant, and available,apart from these services some of networking services also needs to be highly available and for all these services how you achieve that is up to you.

In my next blog I ll write some of the common ways to achieve high availability on these openstack services.